Introduction
An electromagnet can be made by wrapping a wire over an iron rod or bolt. When electric current is passed through the wire, the rod or bolts act like a magnet. When current is switched off, it loses its magnetism. This is called an electromagnet. Its magnetism can be tested by iron nails.
Aim
To make an electromagnet and test its magnetism.
What you will need?
- One plastic or wooden ruler
- Enameled copper wire with bare ends
- One small magnetic compass
- One iron rod or bolt
- One 6 volt battery
Procedure
- Take one iron bolt or rod. The bolt should be about 1 to 114" long. It should be wrapped with about 150 turns of enamelled copper wire.
- Connect the electromagnet to a battery as shown in the figure. As the current passes through the copper wire, it becomes a magnet.
- To test the magnetism, take a magnetic compass and a ruler.
- Place the ruler facing east-west. Now place the compass on its one end in such a way that its pointer faces north-south. When you bring the electromagnet near the compass its pointer will deflect. If you reverse the connections the direction of the deflection will change because the polarity of magnet is changed.
Result
Indroduction
There is a magnetic field around all wires carrying an electric current. The magnetic field around the wire can be increased by coiling more wire into a smaller space. The iron fillings get pulled toward the magnetised nail and form a star burst pattern around the coil of wire.
Aim
To find how electricity and magnetism are related to each other.
What you will need?
- Wire-wrapped nail
- 6 Volt battery
- Masking tape
- Card board
- 15Cm square iron fillings
- Scissors
Procedure
- Ask an adult to punch a hole through the center of the card board using a nail.
- Insert the wire wrapped nail through the hole in the cardboard.
- Make the cardboard sit flat by placing it on the roll of tape.
- Attach one end of the wire to either battery pole.
- Sprinkle a thin layer of iron fillings on the cardboard around the coiled wire.
- Attach the free wire to the open battery terminal.
- Observe the pattern made by the iron fillings.
- Disconnect the wire.
Caution: The nail and wires will get hot if left connected to the battery. Be sure to interrupt the circuit by disconnecting one wire from one pole.Result
The iron filings form a star burst pattern around the coil of wire.
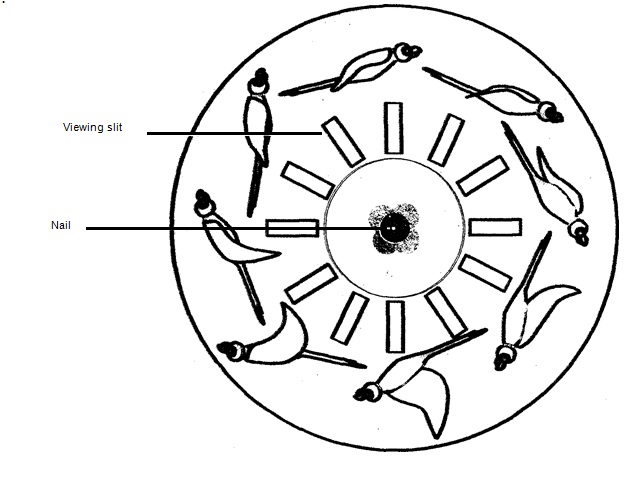
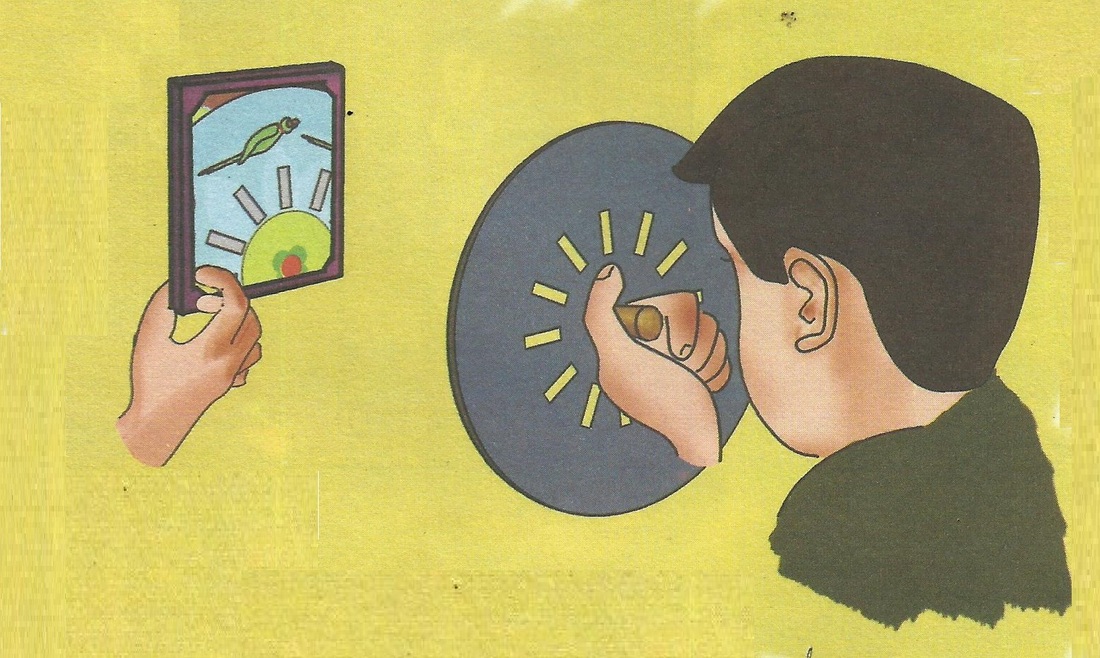
Introduction
Praxinoscope is an animation device. In cartoon films the still photos are made to pass fast enough in front of our eyes so that there seems to be a continuous movement.
Aim
To make a praxinoscope.
What will you need ?
- Cardboard sheet
- Colours
- Sketch pen
- Scissors
- Ruler
- Knife
- Cork and
- Mirror.
Procedure
- Draw a circle of 5" diameter on the cardboard. On the periphery draw a series of images (of flying parrot) at different stages of movement. Mark the positions the slits to be cut. Follow the figure.
- Colour the images and background bright. Cut out the circle. With the help of knife and ruler cut out the viewing strips.
- Pierce the centre of the board and push a nail through it. Fix the nail to the cork. This is the handle of your board.
- Ask a friend to hold a mirror in front of you. The mirror is used so that the praxinoscope is reflected back to your eyes.
- Start rotating the cardboard. View the flying parrots through the slits.
- The cardboard should be rotated in the right direction otherwise the parrots will appear flying backwards.
Result
Moving pictures is an illusion. A moving film is a series of still pictures seen at a high speed.
Introduction
Sounds are produced by vibrating objects. The number of times the object vibrates- moves back and forth, is called the frequency of the sound. As the frequency increases, the pitch of the sound gets higher. Tapping on the bottles causes the bottles to vibrate. As the height of the water increases, the pitch of the sound gets lower.
Aim
To demonstrate how frequency affects the pitch of sound
What you will need ?
- 6 Small mouthed bottles of comparable size
- Metal spoons
Procedure
- Pour different amounts of water in each bottle.
- Gently tap each bottle with the metal spoon.
- Note the difference in the pitch produced.
Result
While tapping the bottles, sounds of different pitch are heard. The bottle with more water makes a low sound and the bottle with less water makes a loud sound.


 RSS Feed